
For those who really enjoy coffee, you’ll start to find that – like any interest – you get a bit deeper into it. Before long, you’ll be trying out all manner of machines and practicing that latte art in no time!
However, one skill that we recommend all coffee lovers at least once is to roast your own coffee beans. The process of making your own beans to the roast level that you like is simply an experience we all need. However, since we doubt that you have space to grow your own batch of coffee in the garden, let’s work with roasting some raw coffee beans instead!
How, then, should you go about this process? First off, you need to make the right investment in terms of the equipment that you use. The first thing that you need to decide upon, then, is what you will actually roast them in. Lots of people at this point will just rush out and buy an expensive coffee roaster, but you don’t need to; with either a stove-top popcorn popping device or even some domestic ovens, you can do the job that you need without too much issue.
Choosing the Best Option
So, to start off with, we recommend that you take the time to find the right kind of roaster. Since the process itself is pretty easy, you should really put a lot of time and effort into finding this solution. The art of coffee roasting is quite a fine art as you get to the tail-end of the experience, but it is by no means whatsoever a challenge once you get the basics down and the general idea of how you go about handling the experience correct.
So, to start off with we recommend that you consider the following kind of options for your roasting device:
- Home Oven. A good starting point that more or less any house should have is a standard domestic oven. So long as you can get the oven to heat up properly and it can give you the ample space that you need to set up the process and get it started. You can also make sure that you just need to use a good quality baking tray and roast them in the oven for about 15-20 minutes.
- Popcorn Popper. As stated above, you could get a lot of mileage out of using a standard popcorn popping device. So long as it sits atop a stove, it should do the job. Just be careful when you are trying to adjust the flame that you do not go too high. This can allow for a more robust roasting experience, though, which many people will naturally want.
- Home Roaster. You could go out and buy a domestic coffee roaster, of course. They tend to have good temperature control (getting the temp right is a big deal) and it can often help you to manage the air to help ensure the roasting process is done right. Probably the best choice, but totally understandable if budgets are an issue.
Setting Up for Coffee
Now, you need to take some time to better work out what the ideal coffee would be for you. We’ve got some good posts on dark coffee brands and light coffee brands that might give you an idea of what you are looking for in terms of coffee tastes and styles.
However, since we are working with untouched green coffee beans, it’s down to personal experimentation and preference. Try and choose a brand from each continent if you can, and you should have little if any problem finding a coffee brand that you want to keep working with.
Not only is this a good way to find the brand that you like, but it can be good way to get a little upfront education on finding the right kind of coffee beans for your own personal choice moving forward.
So, we recommend that you take the time to select the coffee that you need. Once you have chosen a brand that you are happy to try with, it’s important that you understand the roasting process before you begin.
Basically, at this stage you are dealing with a coffee process that has to be closely understood. There is a lot to think about and consider with regards to the roasting process, so let’s take a look at what you need to get right.
The Roasting Process
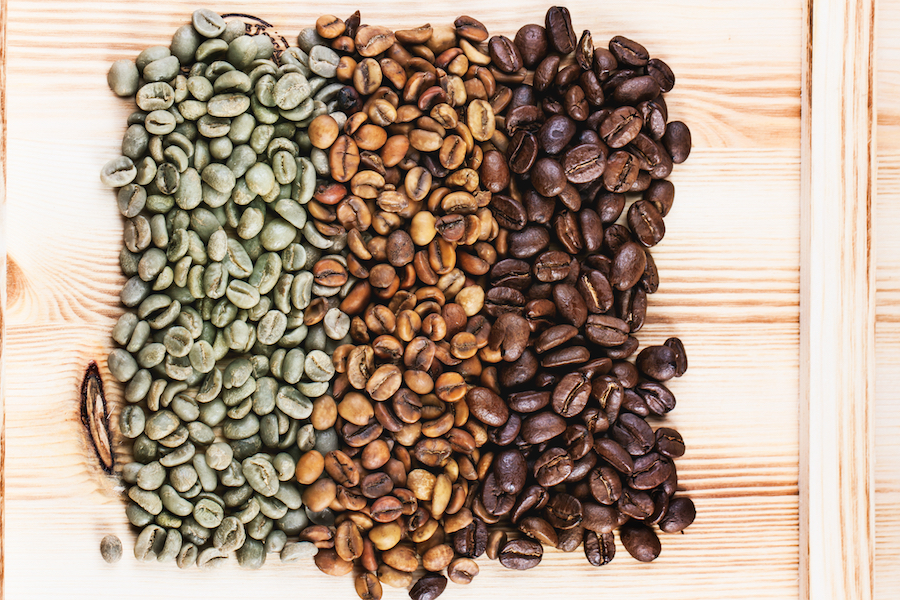
When you start to roast the beans in whatever device that you use, then you will begin to notice a series of small but notable changes to the bean take place. Typically, these can be chronicled as the following:
- First, you should notice the beans going from that normal and harmonious green to a brown, almost flesh-like colour. As this continues, they will eventually go quite golden in shade; this is the beginning of the process really kicking in.
- When this happens you should eventually an audible crack from the coffee bean. This happens when you see steam arising from each bean, and that you can smell that toasted aroma wafting through the house. When that audible noise hears – if you are in the room, you will hear it – then you are on the right path.
- Now, you need to let the roasting continue if you want a darker roast. In terms of a light roast, you could take them off after stage 2. Now, you can simply watch as they continue to go through more of the roasting process. They will go a rich, dark colour and you should begin to see the oils of the bean rise to the surface. This well eventually produce a second, audible crack.
- Most people stop at this point, but you are under no obligation to do so. What you could do is that you could allow it to keep going, but it could cause a charcoal-like taste and the development of carbon dioxide.
What do you do after this process, then?
Post-Roast
Now that your coffee beans are roasted and ready to the level that you like them, you need to store them. This means that you should be able to take the beans and pour them into a metal container. Once they are here, give the beans a gentle blow to help try and remove any chaff that has latched on.
Also, please note that they are still roasting even when leaving the heat; the heat inside will see to that. You should also still feel an obvious heat coming from the beans. So, with that in mind, try and get into the habit of removing the beans a minute or two prior to what you would be happy with, as it will continue afterward.
Now that you are done, you should store them away when they are cooled to a safe temperature. This means using a fully airtight container, preferably a product made specifically for storing coffee. When you do this, you should allow the coffee to vent and remove all carbon dioxide overnight, and seal it up in the morning. Keep it in a dry, cool place out of the reach of the sun.
Doing this should see your coffee last for around six weeks, maybe longer. The unroasted beans should last for around six months, so make the most of them while you can. If you get used to doing this, then you will soon become an expert at really making every cup of coffee exactly to your own taste and preference.

Paul Mason
coffee blogger
Interested to know more about Hot Coffee? Got a question about our content or perhaps want to make a suggestion? The feel free to contact us today.
We’ll be more than happy to take a look at any comments, requests or queries that you may have. Thanks for your time, and we hope that your next cup of coffee that you enjoy is the best one that you’ve had, every time!
Add Your Heading Text Here
